

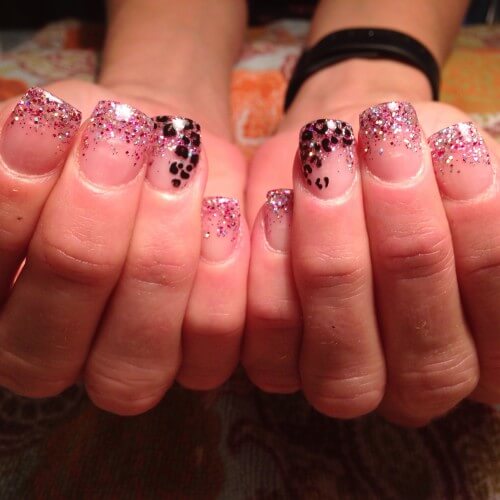
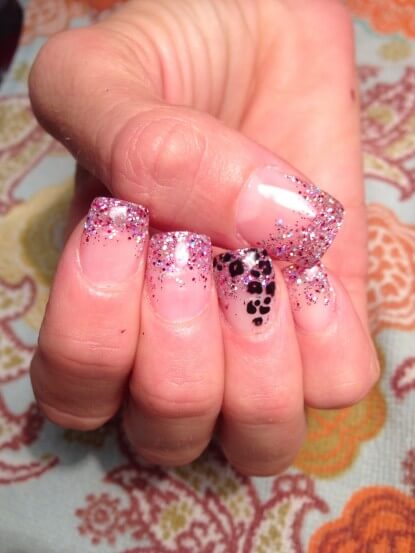
I did these nails for my sister the day before Thanksgiving. She came to town with her cute kids and crashed at our house. I did her little girls nails for her birthday and then decided I’d better practice sculpting a full set since I’m going back to the salon.
I don’t do a lot of hard gel at home, mostly gel polish on natural nails. But I know I’ll get a lot of hard gel clients when I go back to work. Hard gel is so much more durable than gel polish by itself. I actually put a hard gel overlay on myself because gel polish only lasts a week tops since I have my hands in water all day long washing dishes and cleaning.
I love Young Nails!
Back to my sisters nails. I picked up a Young Nails Synergy Gel demo kit at Salon Centric for $19.95. It has a Base, Clear Sculpt, Cover Pink, Flex, Gloss, and Pink Build gel. It also comes with a Finish Gloss and Protein Bond. They are tiny little containers but I bet you could do at least 3-4 full sets with one box. I haven’t been a fan of sculpting gel extensions in the past because they always broke and never held up. Well turns out if you use a SCULPTING gel, it’s an amazing technique. I was using OPI Axxium Build and Young Nails Build to sculpt. They are great gels over a tip but not strong enough to sculpt an extension.
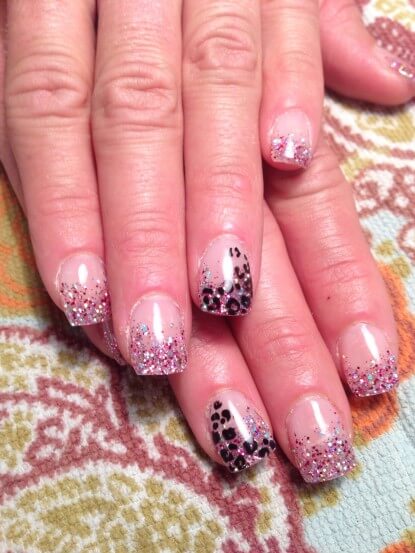
Sculpted Gel Nails with Cheetah and Glitter
Young Nails Sculpt is very thick and took me a minute to get used to. My brush bristles are too long and flexible so they weren’t picking up the gel as well as I would like but after laying a few extensions I got the hang of it. I would switch back and forth between hands having my sister flash cure back and forth. The Sculpt gel is so thick I could have done all five fingers without alternating.
As soon as I took the forms off I could tell Sculpt was going to be strong enough for my sisters rugged life of teaching school, Crossfit training, feeding horses, and everything else rural living entails.
These are the steps I took to create this look:
Young Nails Synergy Gel Sculpted Nails
1. Prep nails. Remove shine, push back cuticles, cleanse, 2 coats Protein Bond.
2. Apply forms, lay sculpting gel up to free edge and float out to desired length and shape. Flash cure for 30 seconds.
3. Remove forms, cure two minutes.
4. Mix loose glitters with clear Build or Flex on a small tile. Apply a small amount on free edge and fade down the nail bed into an ombre pattern. Do all five fingers at once and cure two minutes.
5. Cap glitter mix with Pink Build. Do one finger at a time, flash curing in between. Once the last finger is done cure a full two minutes.
6. Wipe off inhibition layer and lightly file into shape.
7. Wipe off all dust an draw cheetah spots with black acrylic paint or polish. Let dry completely and apply a coat of Finish Gloss. I did two coats of Finish over the ring finger and cheetah spots.
8. Apply cuticle oil and lotion and you are finished!
I was extremely impressed with this Synergy Gel kit! I plan on using Young Nails exclusively for hard gel as well for a few reasons. I LOOOOOVE Build and Flex for fills and backfills, Gloss is a great top coat for stylists because it doesn’t stain, and Sculpt is AMAZING for extensions. Also, I love that I can buy Young Nails at the beauty supply now. I used it in the past but always had to order it and I hate ordering gel. I love buying online but for some reason I hate having to buy my gel and acrylic products online. Anyway, it’s truly a great product. Oh! I almost forgot! My sister didn’t once complain about it burning while curing which is amazing! She said it would start to feel like it might start to burn and then it would stop. I forgot about this amazing fact with Young Nails!
Let me know if you have any questions about sculpting gel nails or nail art or about Young Nails products! Hope everyone had a great Thanksgiving!
Tootles–Anna